Bullet Journal Monthly Spreads are quick and easy to make with a step-by-step process and the right tools. Here are two different methods for creating a Monthly Calendar on a 2 Page Spread. I decided to create a traditional layout split across 2 pages in my bullet journal (also called a bujo). This gives us enough room to write in a few appointments, events, or important deadlines on each day. Plus, we’ll have space for a few extra monthly notes, goals, or tasks.
There are several ways we could create a monthly calendar across 2 pages in our bujo. We can start at the top left on the first day of the month. We could even turn our notebook 45 degrees and make a long calendar. But for this layout, I’m going to stick to the normal open-faced book orientation. This has 7 weekdays across the pages in columns. From here, we just need to figure out what to make on each page.
Deciding Calendar Layout and Size
Columns, Rows, and Calendar Days Layout
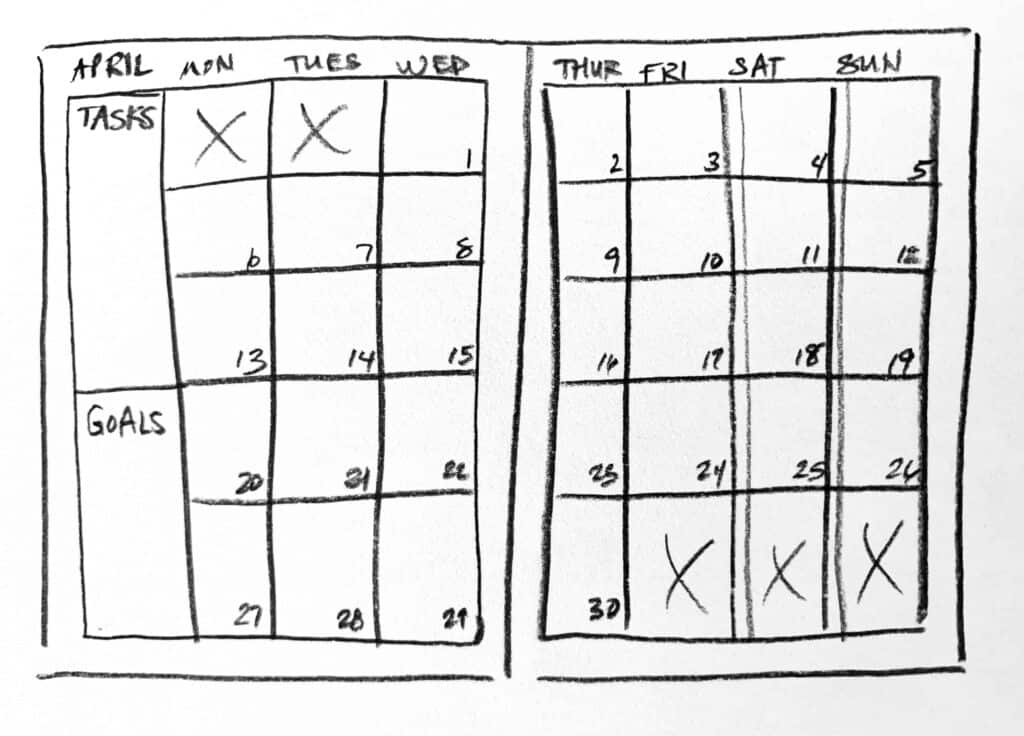
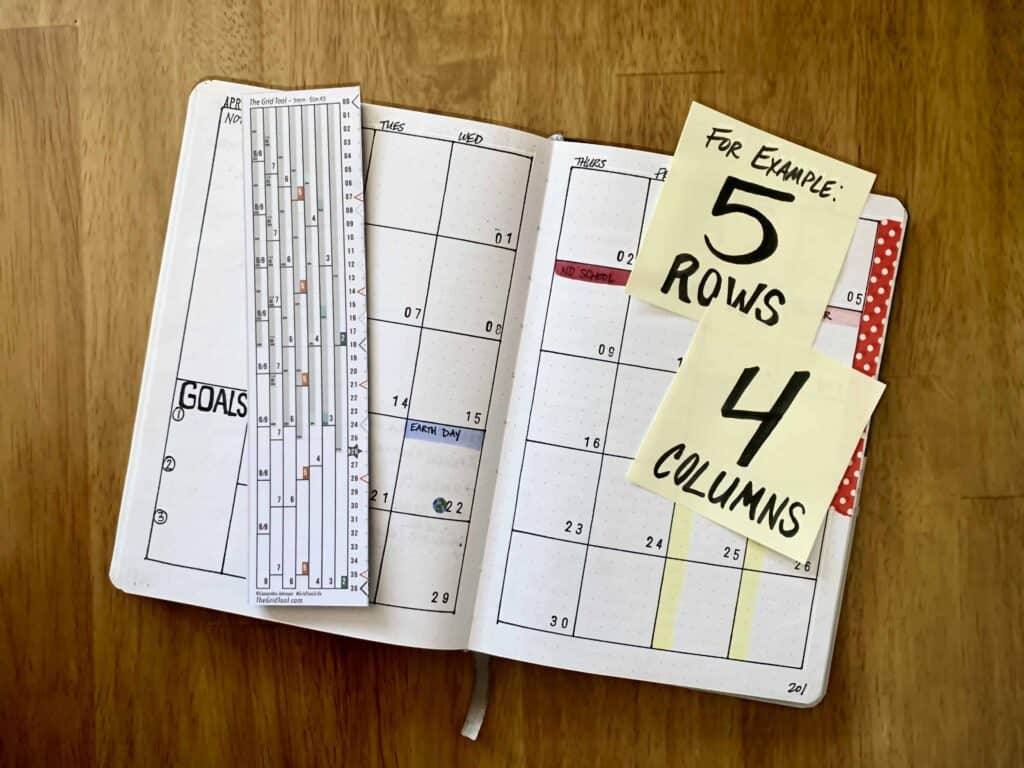
First, I decided to make 5 rows and 4 columns per page. Using 7 out of the eight columns across both pages will allow us to have 7 days per week. And the 5 rows give us 35 boxes – more than enough for our 28-31 days in a month.
Monthly Items vs. Weeks
Next, on the left page, I started the days of the week in the 2nd column instead of the 1st. I split the 1st column into 3/5 and 2/5. In my example, I’d use the larger top column for notes or tasks. Then I’ll designate the smaller bottom column for 3 monthly goals.
Monday Start
And finally, I started my days of the week on Monday. This leaves the weekend days (Saturday and Sunday) next to each other in the last 2 columns on the right page. You can certainly start your weeks on Sunday instead – it’s just personal preference.
So now that we’ve fleshed out our idea, what does it look like and how do we create it?
Finished Bullet Journal Monthly Spread Layout
Here’s how the grid in my Bullet Journal Monthly Spread – 2 Page layout turned out:
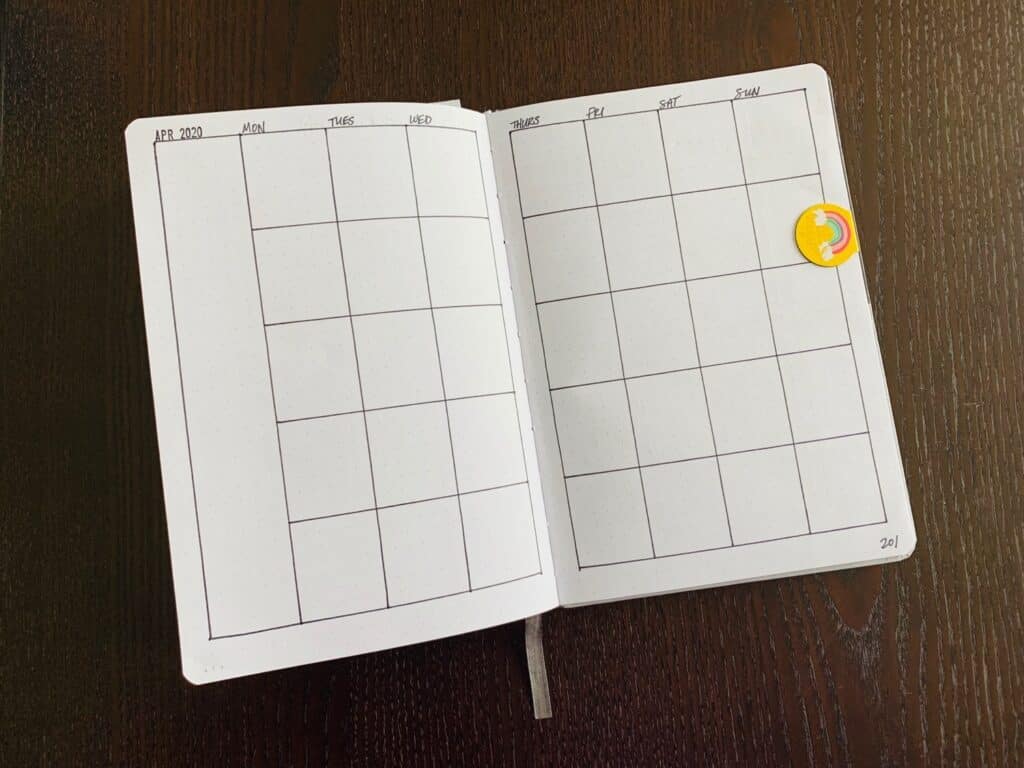
In this example, my ME to We A5 journal has a 5x5mm dot grid pattern. Each page has 27 x39 dots – printed full -bleed (no margins).
This calendar grid layout is minimal and clean. In the photo, I had already dated it with the month, year, and days of the week. But when you get to this point you can use it with any month in any year.
Next, you can add date numbers, sections for tasks and goals in the first column on the left, and colors.
For example, I folded a piece of red and white polka-dotted washi tape on the right page edge. This makes it easy to quickly find my calendar.
I also ran a transparent yellow highlighter marker down the left side of each box on Saturdays and Sundays. This visually separates them from the week (as the “weekend”).
And I started adding in major holidays and events on certain days. Sometimes I even drew cute little icons.
But to get to this point, you have to start somewhere. So here are 2 step-by-step recipes with a list of tools, instructions, and photos.
Recipe: Bullet Journal Monthly Spread – 2 Page Layout
4×5 Grid (per page)
4 Columns
5 Rows
Method #1 – Bullet Journal Monthly Spreads without The Grid Tool
With this method, you’ll create a pencil draft first. To finish, you’ll trace over your lines with a pen or marker for your final layout.
I recommend lightly using a pencil and eraser for your first draft so you can erase any mistakes. I also recommend a calculator and scratch paper for your calculations, and a straightedge or ruler to keep your lines straight.
Using:
- Your Journal
- A Pencil and Eraser
- A Pen or Marker
- A Calculator (optional)
- Scratch Paper (optional)
- A Straightedge or Ruler (optional)
Directions:
To make Columns:
Step #1: Count the number of spaces (not dots) horizontally across one page (for clarity, we’ll call this your Total Spaces).
Step #2: Divide your Total Spaces by 4*. The resulting number is the amount of spaces in each block.
*NOTE: If you don’t get a whole number (vs. a fraction or decimal), you’ll have an extra space (or more), and two choices:
1.) I don’t recommend it, but, for EXACT even divisions, ignore the dots on the page and make marks in between your spaces. Note: this might make things look a little messy if you can’t line everything up exactly.
2.) I recommend following the dots and using any “extra” spaces as margins. Multiply 4 by a number that gets you close to (but not over) your Total Spaces. Alternatively, you can divide your Total Spaces minus 1 and repeat subtracting 1 space until dividing results in a whole number. Then, decide on which side (or sides) you want to add those extra spaces as margins.
Step #3: Using your pencil and starting with a light mark at one corner of where you’re planning your grid, count up to the resulting number you got in Step #2, and make a mark.
Step #4: Repeat Step #3 four more times, until you have all the columns marked out.
Step #5: Draw vertical lines at each mark to make columns**.
**Note: Before drawing lines for your columns, I recommend making your marks for your rows first. Then you’ll know where to start and stop each line, so you don’t accidentally go over into the margin(s).
To make Rows:
Step #1: Count the number of spaces (not dots) vertically down one page (for clarity, we’ll call this your Total Spaces).
Step #2: Divide your Total Spaces by 5*. The resulting number is the amount of spaces in each block.
*NOTE: If you don’t get a whole number (vs. a fraction or decimal), you’ll have an extra space (or more), and two choices:
1.) I don’t recommend it, but, for EXACT even divisions, ignore the dots on the page and make marks in between your spaces. Note: this might make things look a little messy if you can’t line everything up exactly.
2.) I recommend following the dots and using any “extra” spaces as margins. Multiply 5 by a number that gets you close to (but not over) your Total Spaces. Alternatively, you can divide your Total Spaces minus 1 and repeat subtracting 1 space until dividing results in a whole number. Then, decide whether you want to add those extra spaces as margins at the top, bottom, or both.
Step #3: Using your pencil and starting with a light mark at one corner of where you’re planning your grid, count up to the resulting number you got in Step #2, and make a mark**.
**NOTE: Start making your marks about halfway into the page, so you don’t put them inside the first column – see more under Step #5 below.
Step #4: Repeat Step #3 five more times until you have all the rows marked out.
Step #5: Draw horizontal lines at each mark to make rows***.
***NOTE: Before drawing lines for your rows, keep in mind the rows in the 1st column are different than the rest of the grid. You’ll only draw lines at the top, bottom, and under the 3rd row, to split the 1st column into 3/5 and 2/5, respectively.
To finalize:
- Using your pen or marker and a straightedge or ruler, trace over each of your grid lines.
- Wait until the ink/marker dries thoroughly (or you’ll make a smeary mess – ask me how I know).
- Erase all your pencil marks.
Method #2 – Bullet Journal Monthly Spreads with The Grid Tool
With this method, we can create this spread up to 3x faster than using Method #1 (above) or a Grid Spacing Cheat Sheet. In fact, I made a video where I timed myself making this exact spread all 3 ways – you can watch it on my other blog post: Bullet Journal Monthly Spread: TIME CHALLENGE!
You won’t need a calculator or math – because The Grid Tool does all the work for you.
You’ll use The Grid Tool to draw your lines ONCE. That means you can just use your favorite writing tool – even pen or marker – saving you the time you’d usually spend tracing over your lines.
And the side of The Grid Tool will be your straightedge, so there’s no need for a separate tool!
Using:
- Your Journal with dot grid pages
- Your favorite Pen or Marker
- The Grid Tool
Directions:
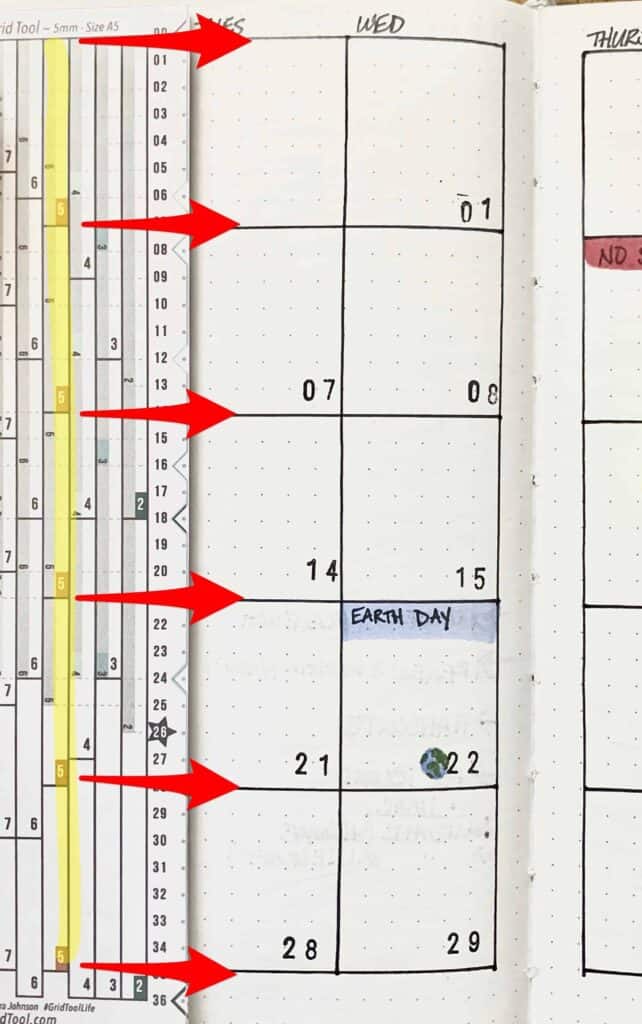
In this example, I used The Grid Tool 5mm Size A5 with an A5 journal with a 5x5mm pattern (see more details above). But you can use these directions with almost any size dot grid journal with a compatible version of The Grid Tool.

To make Columns:
Step #1: Lay The Grid Tool on the page horizontally and move it around on the page until you see where your margins and columns will be with a “4” block section. In this example, I used the “4 Columns” blocks (see photo). The Grid Tool showed me how this 4 column option would leave a 1 space margin on either side.
Step #2: Using your pen or marker, make your first mark at the far left on The Grid Tool (the start of your blocks, and the first red arrow on the left in the photo above), and more marks at the end of each “4” block section you chose (at each of the other red arrows).
Step #3: Using the side of The Grid Tool as a straightedge, draw vertical lines at each mark to make columns*.
*Note: Before drawing lines for your columns, I recommend making your marks for your rows first. Then you’ll know where to start and stop each line, so you don’t accidentally go over into the margin(s).
To make Rows:
Step #1: Lay The Grid Tool on the page vertically and move it around on the page until you see where your margins and rows will be with a “5” block section. In this example, I used the “5 Rows” blocks (see photo).
Step #2: Using your pen or marker, make your first mark at the top of The Grid Tool (the start of your blocks), and more marks at the end of each “5” block section you chose*.
*NOTE: Start making your marks about halfway into the page, so you don’t put them inside the first column – see more under Step #3 below.
Step #3: Using the side of The Grid Tool as a straightedge, draw horizontal lines at each mark to make rows**.
**NOTE: Before drawing lines for your rows, keep in mind the rows in the 1st column are different than the rest of the grid. You’ll only draw lines at the top, bottom, and under the 3rd row, to split the 1st column into 3/5 and 2/5, respectively.
When you use The Grid Tool, you don’t have to count, calculate, or measure. It shows you both the divisions AND margins. In fact, sometimes it can show you more than one way to divide your page. All you have to do is decide how many divisions you want and where on the page you want them.
If you’re using a dot grid journal and making bullet journal monthly spreads, how do you make them? Or do you even use monthly layouts in your bujo? Are they a pain to make?
Do you have an idea for a bullet journal monthly spread you’d like me to create a recipe for? Let me know!