Tips, Tricks, & faq
Compatibility
I've designed The Grid Tool for maximum compatibility with popular brands and sizes of journals and notebooks, but how can you verify it will work with YOURS?
Want to know if The Grid Tool will work with your specific journal, notebook, or planner?
No need to guess - the answer is likely YES! Find out here :
Google Spreadsheet of Notebook Sizes
You can check my Google spreadsheet for your journal or notebook. I've listed specs and compatibility with different sizes of The Grid Tool.
If your notebook or journal isn't listed:
You can verify if at least one version of The Grid Tool is compatible and find out which one is by checking the following in your notebook or journal:
- Your paper has a "Square" Printed Pattern (or No Pattern)
- The Printed Pattern Spacing on your paper (for example: 5mm, 1/4", etc.) matches at least one version of The Grid Tool
- Your notebook or journal's Dimensions matches or is larger than the corresponding Standard Paper Size on at least one version of The Grid Tool (for example, A4, B5, A5, etc.)
- The Grid Space Quantities on each page match or exceed the highest number of BOTH vertical and horizontal demarcations on at least one version of The Grid Tool (for example, the 5mm Size A5 is 26x36 spaces)
You can read more details in my blog posts Which notebooks or journals does The Grid Tool work with? and Will The Grid Tool work with MY notebook or journal?
And - contact me to let me know the specs of your notebook so I can add it!
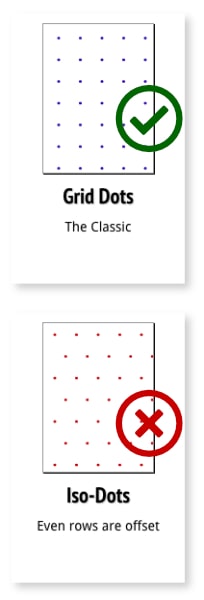
Check for a "Square" Printed Pattern (or No Pattern)
While most artist's sketchbooks have blank pages, the paper inside your notebook or journal may be blank or have pre-printed Lines, Dots, Boxes, Grids, Diamonds, Rectangles, Triangles, etc.
If your notebook or journal has blank pages or the printed pattern is evenly square, you can use at least one version of The Grid Tool. For more information, read my post Which notebooks or journals does The Grid Tool work with?

Match Printed Pattern Spacing
Each version of The Grid Tool specifies its spacing - in millimeters or inches. The most common size is 5mm, however, some brands print their grids at 4mm, 1/4", 1/5", or I've even found odd sizes in-between - like 4.28mm and 3.7mm.
If your journal doesn't specify its grid spacing size, you can check with a ruler.
To measure, place your ruler parallel to a line of dots on your page. Starting with the first dot at zero, does the second dot appear at 5mm, the third dot at 10mm, the fourth dot at 15mm, etc.? And does that happen for both horizontal rows of dots and vertical columns (creating a square pattern)? If each dot consistently shows up 5mm away from the previous one, you can be certain your printed pattern spacing is 5mm (and squared its 5x5mm).
However, if the second dot starts at a measurement other than 5mm OR you notice the dots "walking" across the page at a different pace than one every 5mm, your grid spacing may be 4mm, 1/4", 4.28mm, or another measurement.
The printed pattern spacing should match the spacing (or brand and grid type) specified on your chosen version of The Grid Tool. For more information, read my post Which notebooks or journals does The Grid Tool work with?
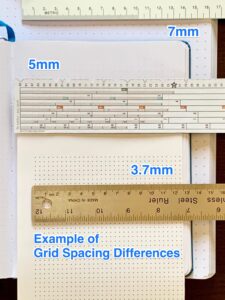

Examples of dot grid patterns printed at different size intervals.
Choosing a Size
Choosing the right size of The Grid Tool for your notebook or journal is easy - just check the following:
Check Dimensions
The dimensions of your notebook or journal are likely close to or exactly one of several standard paper sizes.
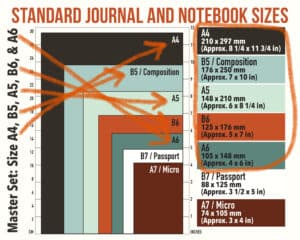

The Grid Tool lists it's size on each version, which is designed to fit a corresponding standard paper size (or brand). Your notebook or journal pages should be equal to or larger than the version of The Grid Tool you're using. In other words, any version of The Grid Tool that fits vertically within the height of a page - AND - horizontally within the width of the page - is compatible with that notebook's page dimensions.
For more information, read my post Which notebooks or journals does The Grid Tool work with?
Check Grid Space Quantities
Different notebook and journal brands print different QUANTITIES of their patterns - both horizontally and vertically on their pages.
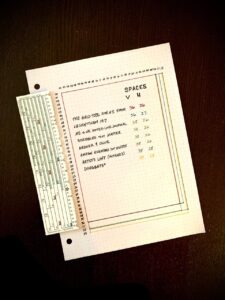

Different brands print their dot grids in different quantities both vertically and horizontally!
If your paper has a grid pattern, here's how to check for maximum compatibility: The total amounts of printed spaces in each (vertical and horizontal) orientation - must be the same or more than those on The Grid Tool.
For more information, read my post Which notebooks or journals does The Grid Tool work with?
Benefits of Multiple Sizes
- Do you use multiple sizes of notebooks or journals?
- Work in materials of various sizes?
- Are you transitioning from one journal to another larger or smaller size?
Consider purchasing a set of The Grid Tool sizes to cover them all.

Guarantee
Satisfaction Guaranteed
Hello fellow gridders!
My name is Cas, and I invented The Grid Tool as a way to help myself and others spend less time in our planners and more time on life.
With the goal and intention of making life better, I craft all my products with love and care. I've created hours of videos, a lot of Tips, Tricks, and How-To information in many articles on my Blog, and a Help Page on this site to serve you.
Due to the nature of Digital Media, I cannot offer a refund, exchange or cancellation after you've been sent or given access to the files and all sales are final. However, if you ever have any questions or issues please contact me through Etsy convo or at https://www.thegridtool.com/contact/ and I will do everything I can to make sure you're happy with your purchase!


Downloading
Purchasing
When you buy any size or set in my Etsy Shop, you get:
• Material: Printable Instant Download (PDF file)
• Free Printing Tips
You WILL NOT receive a printed Grid Tool in the mail. Printable Instant Download Listings are for a high-quality, DIGITAL file only, which means you can simply print The Grid Tool yourself or have it printed.
The Grid Tool is made with care and precision. I used digital vector graphics and saved it as a high-quality print-ready file because I want you to receive a well-crafted product.
Downloading
Your Printable Instant Download is immediately available in your Etsy account OR via a link in the download notification email Etsy sends you upon successful purchase. See https://help.etsy.com/hc/en-us/articles/115013328108 for more info.
If you can't find your download notification email, you're having trouble downloading your files, or you have other issues, see https://help.etsy.com/hc/en-us/articles/115013328108-Downloading-a-Digital-Item?segment=shopping for more info.
Re-Downloading
Please do not copy, edit, share, or redistribute my printables. They can be printed multiple times by an individual purchaser for PERSONAL USE only. Purchasing this file does not transfer copyright.
Etsy stores your Printable Instant Download online in your Etsy account. If you checked out as a guest, you'll find a link to download your purchase in the receipt email that was sent to you after purchase. See https://help.etsy.com/hc/en-us/articles/115013328108-Downloading-a-Digital-Item?segment=shopping for more info.
Printing
Opening the File
To open and print, I recommend using a desktop or laptop computer, not a mobile phone or tablet.
If your computer isn't able to open the file, you can use Adobe Reader - a PDF file program you can download, install, and use for free.
The file itself is NOT editable.
You may print as many copies as you personally need (see Re-Downloading for more info).
Planning for Durability
There are several ways to make your tool sturdy enough for years of regular use:
- Print it directly on cardstock
- Print it on regular printer paper and paste it onto cardstock or cardboard
- Laminate it

Print 'Photo' Quality
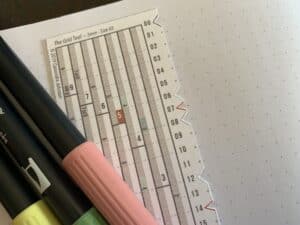
Use 'high dpi' or ‘best’ quality print settings for a sharper print image.
Printing in color will help you quickly differentiate between the most commonly used measurements. If you can only print in black and white, try coloring them with markers or colored pencils.
Note: The colors may differ from screen to print, depending on your individual printer.
Print at 100%
The easiest way to print it is to use the file named the same size as your paper.
Always print at 100% Scale or 'Actual size'.
Check how your printable is going to print by using the print preview. Open the file and go to File > Print or File > Print Preview.
The measurements on the tool will be incorrect if you enlarge or reduce it or choose "Fit" or "Fit to Page".
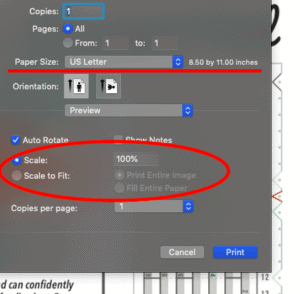

One example of correct print size settings.
Print on the Correct Paper Size
I've designed The Grid Tool printables with wide empty margins on all four page edges. This makes them compatible with any modern printer, whether or not it can print "borderless".
To ensure the measurements on The Grid Tool will be correct, use the matching paper size in your printer (listed at the end of each digital file name) and always print at 100% Scale or 'Actual size'.
If you're in the United States or areas in North America that use US paper sizes:
Most sizes of The Grid Tool are sized to print on standard US Letter size paper (8.5 x 11 in). Because they're very close to or longer than 11 inches, I've sized the largest versions of The Grid Tool to print on US Legal size paper (8.5 x 14 in).
If you're in a country that uses ISO 216 standard and International Paper Sizes:
I've included DIN A4 (and, when applicable, DIN A3) size digital files. You also generally can print US Letter size printables on size DIN A4 (8 1/4 x 11 3/4 in - 210 x 297 mm) or DIN A3 (11 3/4 x 16 1/2 in - 297 x 420 mm) paper. Change the paper size to A4 or A3, but DON'T scale or "Fit" it to anything other than 100%.
Verify Print Scale
Each printable is designed with a Print Sizing Check. You can use an inch or millimeter ruler to verify it printed at the right scale.
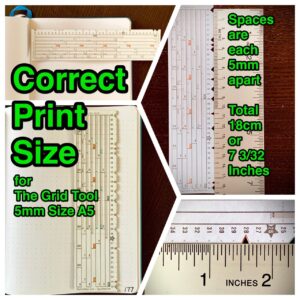

You'll also know it printed at 100% scale if the spaces on the tool are exactly the right amount apart.
For example:
When you line up the start (0) on a millimeter ruler with 00 (on any 5mm version of The Grid Tool) the second dot on The Grid Tool (01) will be at the 5mm mark on the ruler. Then 02 will be at the 10mm mark, 03 at the 15mm mark, and so on.
The Grid Tool 5mm size A5 will measure 18cm or 7 3/32 inches from the 00 to the 36 mark along the side.


Cutting
Paste Before You Cut
If you're planning to paste your printout onto thicker cardstock (or cardboard) to make it more sturdy and ruler-like, I highly recommend cutting it out last. Here's the method I use:
- Gather your tools, including your printout of The Grid Tool, a glue stick, and a piece of cardstock at least an inch larger on each of all 4 sides of The Grid Tool.
- Thoroughly apply an even layer of glue in an area on your cardstock that's a little larger than The Grid Tool.
- Before it dries, carefully lay your printout - print side facing up (glue the back) - on the cardstock and press evenly and thoroughly to apply.
- Wait until the glue has dried, then cut it out.


I print The Grid Tool on regular printer paper and paste it onto cardstock before cutting it out, to make it sturdy like a thick bookmark.
Use a Knife and Ruler
Using a scissors may make your cuts wavy. Instead, I recommend using:
- a cutting mat,
- a metal ruler or straightedge,
- and a sharp craft knife
I suggest first cutting it out as a simple 4-sided rectangle (with 4 straight edges) before making any other (optional) cuts.
For example,
I’ve designed small, color-coordinated triangular notches along the long numbered side of The Grid Tool. They mark the measurements I use most often.
You can cut out the ones I designed or make your own with the tip of a small, sharp craft knife.


You choose whether or not you want to cut out notches. The Grid Tool works wonderfully either way.
Go Slow!
Take your time and line up your metal ruler or straightedge carefully. Hold it securely as you make two short cuts at the top and bottom, and two long cuts at each side.
When cutting thicker paper or board, you may need to make more than one cutting stroke to slice through all the material. I've had the best results using a sharp blade with even and steady pressure.
If you make your cuts straight, you can use the edge of The Grid Tool to help you draw straight lines!


Using
The Grid Tool is designed to be easy and intuitive to use. You simply follow these 3 steps:
#1 Decide: How many sections do I want to make?
#2 Use The Grid Tool to simply show you the possibilities.
#3 Choose: Where do I want my grid?
...no calculating, counting, or guesstimating needed!
For a walkthrough of these 3 easy steps with examples, see How to Use The Grid Tool: Start Here
Placing Your Grid - Margins
The Grid Tool will divide/section a space smaller than its longest side (the vertical sections). This means you will likely have empty margins on your page. Your margins may be to the left or right, or above or below the gridded area you make on your page.
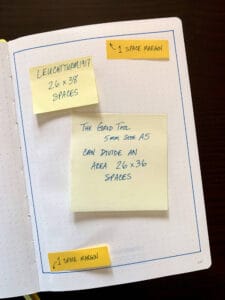

For example, depending on the type and size of notebook you have, The Grid Tool 5x5mm A5 is designed to divide as much of the page as possible in even 5mm increments - an area of 26x36 5mm spaces/squares maximum - minus some margins you can leave at the page edge(s). For more examples and information, you can read my post: What types of notebooks and journals is The Grid Tool designed for? or watch this video:
Reading Row and Column Numbers
When creating rows (left to right), you can split your page into halves, quarters, fifths, and more. Place The Grid Tool lengthwise (up and down) on the page. You choose how many even sections you want and read the large numbers oriented the same (vertically).
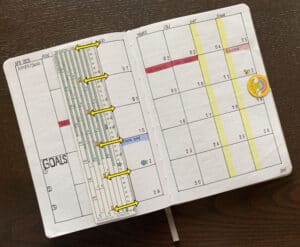

To create columns (up and down), turn The Grid Tool crosswise (left to right). Read the smaller numbers oriented the same (vertically) in the shaded sections.
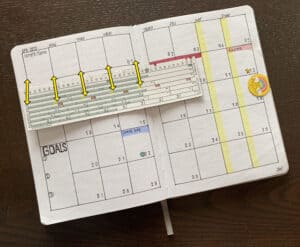

For an in-depth demonstration, see my video: How to make Columns - bullet journal basics (and examples) with The Grid Tool
Getting Creative
Don’t create your designs with all the same proportions. With The Grid Tool, you can mix and match different sizes the SIMPLE way.
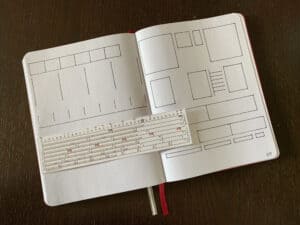

In the video below, I show examples of how to use The Grid Tool as it was designed AND out-of-the-box creative usage.
